How To Setup Canon Printer To WiFi: A Complete Guide
Are you a Canon printer user? I hope you are making the most of it when printing your important documents. But what abou.

Brand Category : Canon

Are you using a Canon printer? I hope you use more of it when printing your important documents. What about WiFi? This redundant method allows you to connect your devices without cables and hassles. Additionally, users can print and scan documents from any system, that is, from anywhere. Learn now how to connect your Canon printer to WiFi and start printing without any problems.
I am a professional printer technician and guide printer users through connection, installation and more. Here I will explain three ways to set up a Canon printer on a WiFi network. I will also share the basic points that users should pay attention to before installing a Canon WiFi printer.
Now let's move on to this useful article.
Ensure your Canon printer supports the type of wireless network (Wi-Fi) available in your home or office. Check if it supports the necessary frequency bands (2.4GHz vs. 5GHz) and security protocols (WPA2, etc.).
Ensure your printer is placed near a power outlet that can supply the necessary voltage and current as specified by the manufacturer.
A compatible router is necessary to make a successful WiFi connection. So, it is your job to move to your router and find if it includes a WPS (WiFi Protected Setup) button. If the button is not present, try out the manual method.
These are the four things that are important in performing WiFi printer setup.
Canon printer users can use several connection methods to add their printing devices to WiFi. In this section, I will cover them one by one. Thus, they get a complete idea of the methods and then go with the one that is suitable.
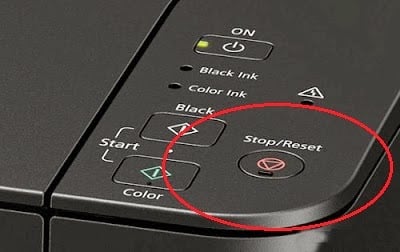
Are you planning to connect your printer wirelessly? Use the WPS button on your printer and then connect your device to WiFi. Here are a few steps that can help you.
That's how easily you can connect your Canon printer to a WiFi network. But what happens when your router doesn't include a WPS button? Luckily, there are more methods I will discuss in the post. So, keep reading it.
WPS pin code connection method will connect your wireless printer and network efficiently. Find below how you can make an efficient connection. Here is how to set a Canon printer to WiFi.
Did this method work for your purpose? You can now see that the WiFi light on your Canon wireless printer is lit, and hence, there is a successful connection. Are you looking for another method?
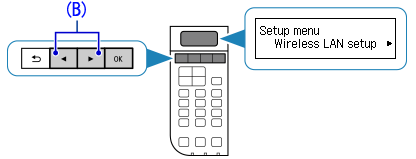
Here is another WiFi connection method to add your Canon printer to a WiFi network. This method just requires the SSID and password. Follow the steps given below.
After you connect your printer to the WiFi network, you can print the documents you need. Print them from any system, whether you have a Windows or Mac computer. Moreover, if there is an issue, you can perform a Canon printer WiFi connection password reset, too.
Hope these three methods help you make the connection and print from your Canon printer without wires. You can choose the one that is ideal for you.
A Canon printer is suitable for both personal and professional printing tasks. Its user can connect the device to WiFi by learning how to setup Canon printer to WiFi. After the printer connects to the WiFi network, users can start printing and scanning the documents they need. There are three major methods of connecting the printer to a WiFi network. These are done through the WPS button, WPS PIN code, and SSID and password.
Are you a Canon printer user? I hope you are making the most of it when printing your important documents. But what abou.
![How to Fix Offline Brother Printer [3 Easy Methods]](https://himanshiphotostudio.in/printer/assets/img/New Project (54).jpg)
As a printer specialist, I have worked with different brands of printers. My main job was to troubleshoot printer errors.

![How to Connect Brother Printer to iPhone? [A Complete Guide]](https://himanshiphotostudio.in/printer/assets/img//6569bf0d6868b_women-colleagues-working-together-project.jpg)
Today, hardly anyone likes to use a printer with unwieldy wires. Since printers come with wireless features, every singl.