.jpg)
How To Download HP Printer Driver For Windows 10?
Are you going to set up your new HP printer? Whether you want to set up the new printer or want to reinstall it on your .

Brand Category : HP
![How to Connect Brother Printer to iPhone? [A Complete Guide]](assets/img/65212130ed0d7_two-women-entrepreneurs-working-together-office.jpg)
Have you bought your own Brother printer and are looking for a way to use it wirelessly? Don’t worry; we’ve got you covered! Setting up a Brother printer is always an exciting task. However, different printers have their own way of connecting it to Wi-Fi. To simplify this setup, Brother printer users can follow this blog, which gives you step-by-step instructions on how to connect Brother printer to Wi-Fi. The blog will teach you two different methods to connect it to a Wi-Fi network on Windows/Mac. These two methods are Infrastructure mode and the WPS push button. Let us first determine the wireless settings. So, we will move to connect the printer to the Wi-Fi network on Windows and Mac.
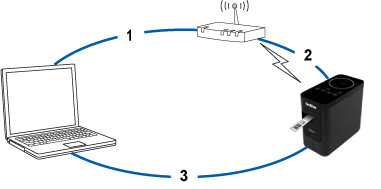
We can’t start connecting the printer to Wi-Fi directly. Before this, you must know your wireless settings. However, the users will need to know about the Network Name (SSID or ESSID) and network Password Network Key, Security Key, and Encryption Key) before connecting their Brother printers to Wi-Fi.
You can find this information on the side of the router. There are chances that you will find the information on the stickers pasted on the router. If you can’t find it on the router, you can check its documentation. Through this documentation, you will find the way to find this information via browser.
Once you have network-related information, you can proceed with the method to connect your Brother printer to a wireless network.
Users can connect their Brother printer to the Wi-Fi network easily via Infrastructure Mode. The setup uses a Wi-Fi access point or router to make the Brother printer wirelessly.
Connecting the Brother printer to a Wi-Fi network via Infrastructure Mode is quite similar for both Windows and Mac computers. Now, let’s see another method to connect the Brother printer to a Wi-Fi network.
This method is the easiest method that easily connects the Brother printer to Wi-Fi. However, if your router supports WPS, then you can proceed with the steps below:
In short, this blog provides a brief answer to the question of How to connect Brother printer to Wi-Fi. It outlines the wireless settings and gives step-by-step instructions for connecting the printer using two different methods. The first method is Infrastructure Mode, which is suitable for both Windows and Mac users. Also, the WPS method is considered the simpler and more easy option. Feel free to select any method that suits your needs.
Are you going to set up your new HP printer? Whether you want to set up the new printer or want to reinstall it on your .
.jpg)
Have you bought your own Brother printer and are looking for a way to use it wirelessly? Don’t worry; we’ve .

.jpg)
Did you recently buy a Canon printer but are facing trouble while establishing a connection between two devices? If you .